General information
Berlin has a 3D city model which was developed from 2007-2009 and has been successfully used at the Business Location Center in Berlin to virtually represent the economic regions of Berlin. Until 2018, a building-oriented LoD2 model of Berlin was used for 3D presentations; as of 2019, a 3D mesh model was used which was automatically derived from a survey flight.
As part of the Open Data Initiative of the state of Berlin, the Senate Department for Economic Affairs, Energy and Public Enterprises has made both 3D models available to download for free.
Differences and key figures between the two models
| 3D mesh model | Object-oriented LoD2 model | |
|---|---|---|
| Actuality | Based on a photoflight from August 2020 | First recording 2007-2009, last update 2014 based on a photoflight from summer 2013 |
| Characteristic | Textured, area-wide 3D mesh model without object information | Over 560,000 textured individual buildings based on ALKIS floor plans with roof structures (LoD2 model) |
| Original data format | OBJ and texture pictures (tiled) | CityGML and texture images |
| Download | Tile by tile as OBJ via interactive selection using the download portal | District by district as CityGML (as ZIP archives) or via interactive selection inside the download portal in various formats |
Technical requirements
The Berlin 3D – Download Portal can be accessed from any computer connected to the Internet that has a WebGL-enabled browser. JavaScript must be enabled in your browser to correctly display and use the map application. WebGL is a programming interface for web browsers to display 3D graphics without additional extensions. It is enabled by default in all major browsers since 2011. Internet Explorer supports WebGL starting with version 11; for older versions there is an IEWebGL plug-in. Microsoft Edge supports WebGL starting with version 0.95.
There is a test page on the official WebGL website where you can check to see if your browser supports WebGL: http://get.webgl.org
Wikipedia has a list of all the browser versions that support WebGL.
Hardware recommendations
In addition to basic WebGL support, it is also important that your hardware support the high-performance display of 3D content. If you encounter
any problems, you should therefore verify that your graphics driver is up to date. Nevertheless, older or weaker systems may encounter
limitations or loss of performance.
User interface
The application opens in 2D view upon launch.
Via the vertical control bar you have the possibility to switch to the mesh view or the LoD2 view.
Using the drop-down menu, you can choose whether to switch to mesh view or LoD2 view. Choosing the view does not automatically select the corresponding model for data export. This is done by selecting the data source in the export menu.
The search function at the top right of the application includes a search box which allows you to go directly to a selected address.

Export menu
The export menu can be viewed using the corresponding button on the top right-hand side. This will then be displayed on the left of the map window in the application. Here you can choose your export settings. Various selection tools and file formats are available depending on the data source (3D mesh model or LoD2 model) chosen here. After specifying an area for export using the corresponding tool, you can choose which selected areas are displayed to you via the drop-down menu within the views.
The search function on the top right-hand side of the application displays a search box which directs you to a selected address.
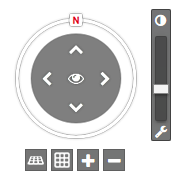 Compass rose
Click on the compass rose arrows to move in that direction on the map. The N symbol makes it possible to rotate the map in the 3D view. Click on
the N to reorient the map north. Click on the eye icon in the middle of the element to start automatically rotating the map around the selected
view. Click again on the icon to pause the rotation. This feature is also only available in the 3D view.
Press on the plus and minus keys to zoom in or out on the map. It is also possible to tilt the view in
3D mode.
The terms of use as well as the imprint can be found in the footer.
3D mesh model
1. 3D mesh model view
By selecting the “Mesh” view in the vertical menu bar, you can move through Berlin in the 3D mesh model. Open the export menu to specify an area to export. Here, select the data source for export. The 3D mesh model is selected as the default in this case.
1. Object selection (Selection of one or more LoD2-buildings)
Here you can select single and multiple buildings by adding or removing the corresponding objects to your selection by mouse clicks, use
Ctrl + left click.
2. 3D mesh model selection options
Using the “area selection” tab in the export menu, you can select a polygon or rectangular bounding box to draw out in the map. Select the corresponding symbol and then click on the map.

Polygon tool
To display a selection area, first select the polygon symbol and then click on the map multiple times to draw out a bounding box. The bounding box will be displayed as a white, transparent area while drawing. By double-clicking when placing the final point, this connects the boundary areas and completes the search area.
Editing the boundary markers:
| Cancel selection | Press the ESC key |
| Add a new boundary marker | click on the outline using the mouse |
| Delete boundary marker | Click on the boundary marker while holding down the Shift key |
| Move boundary marker | Drag the boundary marker while holding down the ALT key |
2.Rectangular bounding box
To draw out a rectangular bounding box, first click on the corresponding symbol in the export menu. Click twice to place the rectangle. The first click on the map marks the top left boundary marker, the second marks the bottom right. The bounding box will be displayed as a white, transparent area while drawing.
Editing the boundary markers:
| Cancel selection | Press the ESC key |
| Move boundary marker | Drag the boundary marker while holding down the ALT key |
Here, you also have the option to move the positions via the input fields for X and Y values for both boundary markers.
Note:
In mesh view, the individual boundary markers are not displayed and cannot be edited. A different view (2D, LoD2) must be selected in this case!
By clicking on the check icon in the export menu you confirm your selection to finish drawing. To edit the building or boundary markers, click on the pencil symbol and then click on the building using the mouse.
If you have already selected an area and click on one of the two selection tools again, this will undo your selection.
Export/import of geometries
By clicking on the download/upload icon, you can export and import geometries (polygons only) in GeoJSON format.
3. Export 3D mesh model

Using the export menu on the left-hand side of the map window, you can download the mesh model as an OBJ tile. After selecting an area, you must confirm the terms of use by clicking on the check box. You will then be given the option to submit your request using the corresponding button.
Your selection will be displayed in tile view and you can download this as an OBJ in a Zip file. To select individual tiles and download them, click on the individual Zip file in the left-hand side export window. The corresponding tiles will be highlighted in red.

10 tiles are displayed per page. To select additional tiles, click on the next page number at the bottom edge of the export menu.
4. File format example
 The files are available to download in OBJ format.
LoD2-Modell
1. LoD2 model view
By selecting the “LoD2” view in the vertical menu bar, you can move through Berlin in the LoD2 mesh model. Open the export menu to specify an area to export. Here you can select the data source for export. Since the 3D mesh model is selected by default, you must change the data source accordingly.
2. Export options
You can download individual buildings or smaller districts (up to 9 km²) in six different file formats. The original files (CityGML+skins) are available as individual data packages, separated by Berlin’s districts, from the following site (Zip files):
www.businesslocationcenter.de/downloadportal/
1. Object selection (Selection of one or more LoD2-buildings)
Here you can select single and multiple buildings by adding or removing the corresponding objects to your selection by mouse clicks, use
Ctrl + left click.
2. Area selection (LoD2, Mesh)
The area selection allows the user to select the objects to be exported based on a spatial extent. For that, a geometry (polygon or bounding box) needs to be defined. The objects whose centre points are contained within this geometry will be exported. The user is also able to upload a geojson file or export the selection shape after drawing.
To create a polygon-shaped selection, first click on the corresponding symbol to activate that function. You can then define a polygon by clicking on at least three different points on the map. Any objects whose centre points are contained within the selected polygon will be exported.
To define a rectangle-shaped selection, activate the corresponding icon and then click on at least two diagonally opposite points on the map. Any objects whose centre points are contained within the selected rectangle will be exported.
Email address
As the export process can take several hours, the user needs to provide an email address. When the export process is finished a download URL pointing to the exported data will be sent to this email address.
The email address serves only to create and send the automatic reply email with the download link. When the automatic data extraction and provision fails, virtualcitysystems as the operator of the download portal receives a system notification about the failure of the delivery of requested data to a particular recipient. Only in this case will your email address be passed on to the operator of the portal in order to get in touch with you and subsequently enable to provide the data. In all other cases, email addresses are not passed on, stored or otherwise used. Email addresses which were transmitted to the portal operator due to failed delivery attempts will also be deleted after solving the problem.
Model settings
In the model settings, you can decide whether you want to obtain textured or non-textured building models, possibly specify the display criteria (RGB texture, suitability for photovoltaics, suitability for solarthermics) and finally choose the desired data format. The following chart shows an overview of the formats and a short description. Detailed information can be found in the chapter Examples.
| Data format | Description | Textures |
|---|---|---|
| 2D shape | 2D floor plan polygons in the ESRI shapefile format | no |
| 3D shape | 3D buildings (PolygonZ geometry) in the ESRI shapefile format | no |
| KMZ | KMZ with KML geometry of the buildings | no |
| CityGML | CityGML 1.0 | yes |
| DWG | Autodesk DWG format | no |
| DXF | Autodesk DXF format | no |
| 3DS | Autodesk 3DS format | yes |
Examples of the available data formats
| Picture | Description |
|---|---|

|
|

|
|

|
|

|
|

|
|

|
|
Navigating in the application
You can use the mouse or keyboard to navigate around the map in the 2D or 3D view.
2D map
| ... with the mouse | ... with the keyboard | |
|---|---|---|
| Move the map | Press the left mouse button and drag the map | Use the arrow keys to select the corresponding direction |
| Zoom in / zoom out | Scroll with the mouse wheel to zoom in or out of the map | Press the plus or minus key |
3D map
| ... with the mouse | ... with the keyboard | |
|---|---|---|
| Move the map | Press the left mouse button and drag the map | Use the arrow keys to select the corresponding direction |
| Tilt the view | Press and hold the mouse wheel down while moving the mouse upwards or downwards | Press the Page Up or Page Down key |
| Rotate the view | Press and hold the mouse wheel down while moving the mouse left or right | Press the Home or End key |
| Zoom in / zoom out | Scroll the mouse wheel to zoom in or out of the map | Press the plus or minus key |

